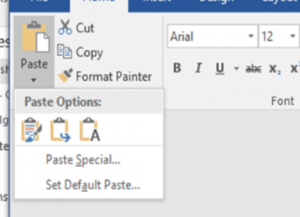
Microsoft marked a turning point for Windows 10 with the Creators Update; while there were no earth-shattering upgrades included, it’s more like a mature OS version now. One of many features that flew in under the radar, was the ability to print to PDF or rather save to PDF.
You can finally print (or save) to PDF without using a third-party utility by using Microsoft’s Print to PDF. This makes it much easier to save and distribute documents that aren’t easily modified. This one was long overdue.
https://www.infotechmontreal.com/wp-content/uploads/2020/05/InfoTechMTL_Logo_Horizontal-1.png00Kim Grimeshttps://www.infotechmontreal.com/wp-content/uploads/2020/05/InfoTechMTL_Logo_Horizontal-1.pngKim Grimes2017-08-22 21:34:362017-08-22 21:34:36Print to PDF
There are literally hundreds of keyboard shortcuts, most of which no one will ever use. I pretty much use 5 to 10 shortcuts on a daily basis. In this post, I will run through the ones I think you should know.
Windows Key – Simply pressing the Windows key will bring up the Start Menu. I use this shortcut the most often because you can just start typing the name of an application or Store app or computer setting and then press Enter to open it.
Windows Key + D – This will hide all windows and show you the desktop. If you press it again, it will bring back the same windows that were active earlier.
Windows Key + L – This will lock the screen in Windows 10.
Windows Key + E – Opens Windows Explorer.
Windows Key + R – Brings up the Run dialog box, which lets you quickly run commands.
Windows Key + Tab – This will show you a thumbnail of all open programs on the current desktop and also a small thumbnail of each desktop at the bottom. You can use the arrow keys to select a different program on the active desktop.
Windows Key + I – Opens the Windows 10 Settings dialog where you can configure the network, backups, WiFi, privacy, security and lots more.
CTRL + Windows Key + L/R Arrow – This will let you switch between desktops quickly using the right or left arrows in conjunction with CTRL + Windows Key. The order for the first two keys doesn’t matter.
Ctrl + Shift + Esc – This will bring up the new Windows 10 Task Manager.
Windows Key + C – This will bring up Cortana in listening mode, if you have Cortana enabled. This is a handy shortcut if you use Cortana often.
Windows 10 has a “secret” Start menu. Ok, its not really a “secret” — it’s not something you have to turn on, it’s just a little trick that makes accessing important features, such as the Command Prompt, the Control Panel and the Task Manager much easier.
To access this additional menu, right-click the Windows icon/Start button. You’ll see a pop-up menu with a variety of administrative tools, as well as shutdown options and a Desktop link for quickly viewing the desktop.
https://www.infotechmontreal.com/wp-content/uploads/2020/05/InfoTechMTL_Logo_Horizontal-1.png00Kim Grimeshttps://www.infotechmontreal.com/wp-content/uploads/2020/05/InfoTechMTL_Logo_Horizontal-1.pngKim Grimes2017-07-31 23:38:042017-07-31 23:38:04Windows 10 ‘secret’ start menu
To quickly free up drive space on your PC, follow these steps:
Open My PC, by double clicking on the “My PC” icon (usually on your desktop)
Right click on Drive C and choose properties, you should see this:
3. Select disk cleanup
4. In the next window, it will automatically select items you can delete to free up space. By clicking on each item, it will give you a description so you will know what you are deleting. Just by deleting the windows temporary files, it will free up some space on your PC.
5. Select what you want to remove and click OK.
That’s it! Freeing up even a little space can help applications run smoother and quicker.
https://www.infotechmontreal.com/wp-content/uploads/2020/05/InfoTechMTL_Logo_Horizontal-1.png00Kim Grimeshttps://www.infotechmontreal.com/wp-content/uploads/2020/05/InfoTechMTL_Logo_Horizontal-1.pngKim Grimes2017-07-17 22:29:592017-07-17 22:29:59Free Up Drive Space
Different Ways of Customizing the Windows 10 Lock Screen Image
If you want to know how to add or change the Windows 10 lock screen image, you are at the right place. We will be looking at steps you will have to follow for this task in the next few sections. You could use a background image, an image fetched from Bing shown with the help of Windows Spotlight, or any personal picture. You can also use a collection of photographs from a single or several folders.
Customizing the Windows 10 Lock Screen Image
Windows 10 login screen is the first thing you see when you turn on your PC. The image you see can be a stock image or one of your own pictures. Here is how to set the lock screen picture on your PC;
Use the WinKey + I hotkey to open the Settings App
Choose Personalization
Choose Lock screen
That should bring you here;
4. In the drop-down menu labeled Background, click either Picture, or Slideshow.
If you choose Picture, you will be shown some images to choose from. You may also click the Browse button to select another image on your PC.
If you choose Slideshow, you will be offered more Pictures, or you can select a specific folder
That’s it! Happy Customizing!
Use of Windows Spotlight
Windows Spotlight connects with the search engine Bing to show a fresh image every time users log in to Windows 10. This feature can be enabled by:
Opening Settings from the Start menu.
Selecting Personalization.
Selecting the Lock Screen.
From the Background drop down menu, select Windows Spotlight.
By following these steps, you will be able to activate Windows Spotlight and view a different image at every login.
View a Single Image
If you are more interested in viewing a single image on your lock screen, then you will have to follow these steps:
Click on the Start menu and click on Settings.
Select the Personalization option.
Select Lock Screen.
From the drop-down menu, select the option called “Picture.”
Next, browse and choose the image that is to be used.
Moreover, you can toggle the switch if you do not want to see tips, fun facts, etc. from Cortana and Windows, to have a cleaner experience.
Use a Collection of Images
Another option is to use a collection of images present in a single or multiple folders. Let us look at the steps that you will have to follow:
Go to the Start menu, select Settings.
Select Personalization and click on Lock Screen.
From the drop-down for Background, choose Slideshow.
Click on the Add Folder option.
Browse and select the folder that contains your preferred images.
There are also Advanced Slideshow Settings, which can be used for enabling or disabling options. You can include photographs from your Camera Roll as well as your Camera Roll on OneDrive. The Camera Roll on OneDrive is likely to have images from your mobile and other types of devices. You can also show pictures that fit the screen, in cases where there are images of multiple sizes.
You can also set the Windows 10 lock screen to be shown instead of the screen being turned off when the system is inactive. This option is very much like the feature that is used for the setup of a screensaver. Moreover, it is also possible to tell the system when the screen is to be turned off when the slideshow has continued for a specific time period.
If you are looking for more tips and suggestions on how to customize your Windows 10 system, then you can go through other informative sections of our website. You can also give us a call, and our technical experts will do their best to answer your queries so that you can make better use of your operating system.
https://www.infotechmontreal.com/wp-content/uploads/2020/05/InfoTechMTL_Logo_Horizontal-1.png00Kim Grimeshttps://www.infotechmontreal.com/wp-content/uploads/2020/05/InfoTechMTL_Logo_Horizontal-1.pngKim Grimes2017-07-10 21:57:212021-07-12 16:58:01Steps in Customizing Windows 10 Lock Screen Image
In this article, we are assuming that you have connected your printer to either the wireless network or wired network.
Most new wireless printers allow you to do this on the on-screen display of the printer, but some older wireless printers require you to connect the printer directly to a computer first, configure the wireless settings and then disconnect it.
Once the printer is connected, go ahead and click on Add a printer in the Devices and Printers dialog on your PC.
Now, if the printers are on and connected, magic should happen and any printers on the network not already added to your computer should appear in the list. If they do not show up, you should click on The printer that I want isn’t listed link at the bottom to troubleshoot.
If all is well, click on the printer you want to install and then click Next.
Windows will automatically setup the printer by installing the appropriate printer drivers onto the system. If available, it’ll download the drivers from the printer itself.
After a few seconds, the printer should be successfully added and you’ll be able to print a test page. Note that this procedure will be able to find wireless or wired printers on the network.
https://www.infotechmontreal.com/wp-content/uploads/2020/05/InfoTechMTL_Logo_Horizontal-1.png00Kim Grimeshttps://www.infotechmontreal.com/wp-content/uploads/2020/05/InfoTechMTL_Logo_Horizontal-1.pngKim Grimes2017-07-03 14:42:192017-07-03 14:42:19Adding a Printer in Windows 10
Choosing a new screen resolution used to involve locating and browsing through the Display Properties applet. Windows 7 made this far simpler, though – just right-click an empty part of the desktop, select Screen Resolution and you’ll immediately see the appropriate options.
https://www.infotechmontreal.com/wp-content/uploads/2020/05/InfoTechMTL_Logo_Horizontal-1.png00Kim Grimeshttps://www.infotechmontreal.com/wp-content/uploads/2020/05/InfoTechMTL_Logo_Horizontal-1.pngKim Grimes2017-06-26 22:07:472017-06-26 22:07:47Easily set screen resolution in Windows 7
We may request cookies to be set on your device. We use cookies to let us know when you visit our websites, how you interact with us, to enrich your user experience, and to customize your relationship with our website.
Click on the different category headings to find out more. You can also change some of your preferences. Note that blocking some types of cookies may impact your experience on our websites and the services we are able to offer.
Essential Website Cookies
These cookies are strictly necessary to provide you with services available through our website and to use some of its features.
Because these cookies are strictly necessary to deliver the website, refuseing them will have impact how our site functions. You always can block or delete cookies by changing your browser settings and force blocking all cookies on this website. But this will always prompt you to accept/refuse cookies when revisiting our site.
We fully respect if you want to refuse cookies but to avoid asking you again and again kindly allow us to store a cookie for that. You are free to opt out any time or opt in for other cookies to get a better experience. If you refuse cookies we will remove all set cookies in our domain.
We provide you with a list of stored cookies on your computer in our domain so you can check what we stored. Due to security reasons we are not able to show or modify cookies from other domains. You can check these in your browser security settings.
Google Analytics Cookies
These cookies collect information that is used either in aggregate form to help us understand how our website is being used or how effective our marketing campaigns are, or to help us customize our website and application for you in order to enhance your experience.
If you do not want that we track your visit to our site you can disable tracking in your browser here:
Other external services
We also use different external services like Google Webfonts, Google Maps, and external Video providers. Since these providers may collect personal data like your IP address we allow you to block them here. Please be aware that this might heavily reduce the functionality and appearance of our site. Changes will take effect once you reload the page.
Google Webfont Settings:
Google Map Settings:
Google reCaptcha Settings:
Vimeo and Youtube video embeds:
Privacy Policy
You can read about our cookies and privacy settings in detail on our Privacy Policy Page.